Developing and bringing machine learning models into production is a task with a lot of challenges. These include model and attribute selection, dealing with missing values, normalization and others.
Finding a workflow that puts all the gears, from data preprocessing and analysis over building models and selecting the best performing one to serving the model in a real time API, into motion is the one I want to discuss here.
Life cycle of a machine learning model
The life cycle of machine learning is basically described by the iteration of the following four steps.
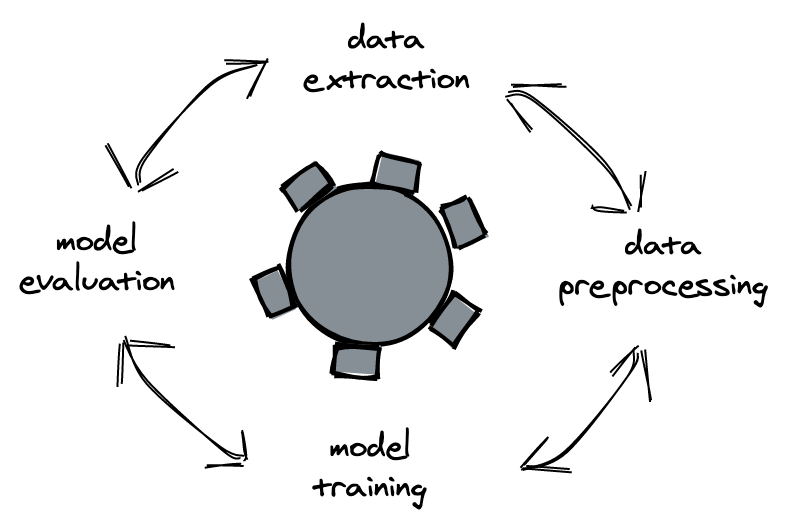
Each of these steps is under constant evaluation. Especially in case model performance can be enhanced by adding different data attributes or preprocessing methods.
For the presented approach we split the process of modeling into two other parts. Part one contains the above mentioned four steps and we call it Manual Run Modeling. Step two is automating the steps of part one.
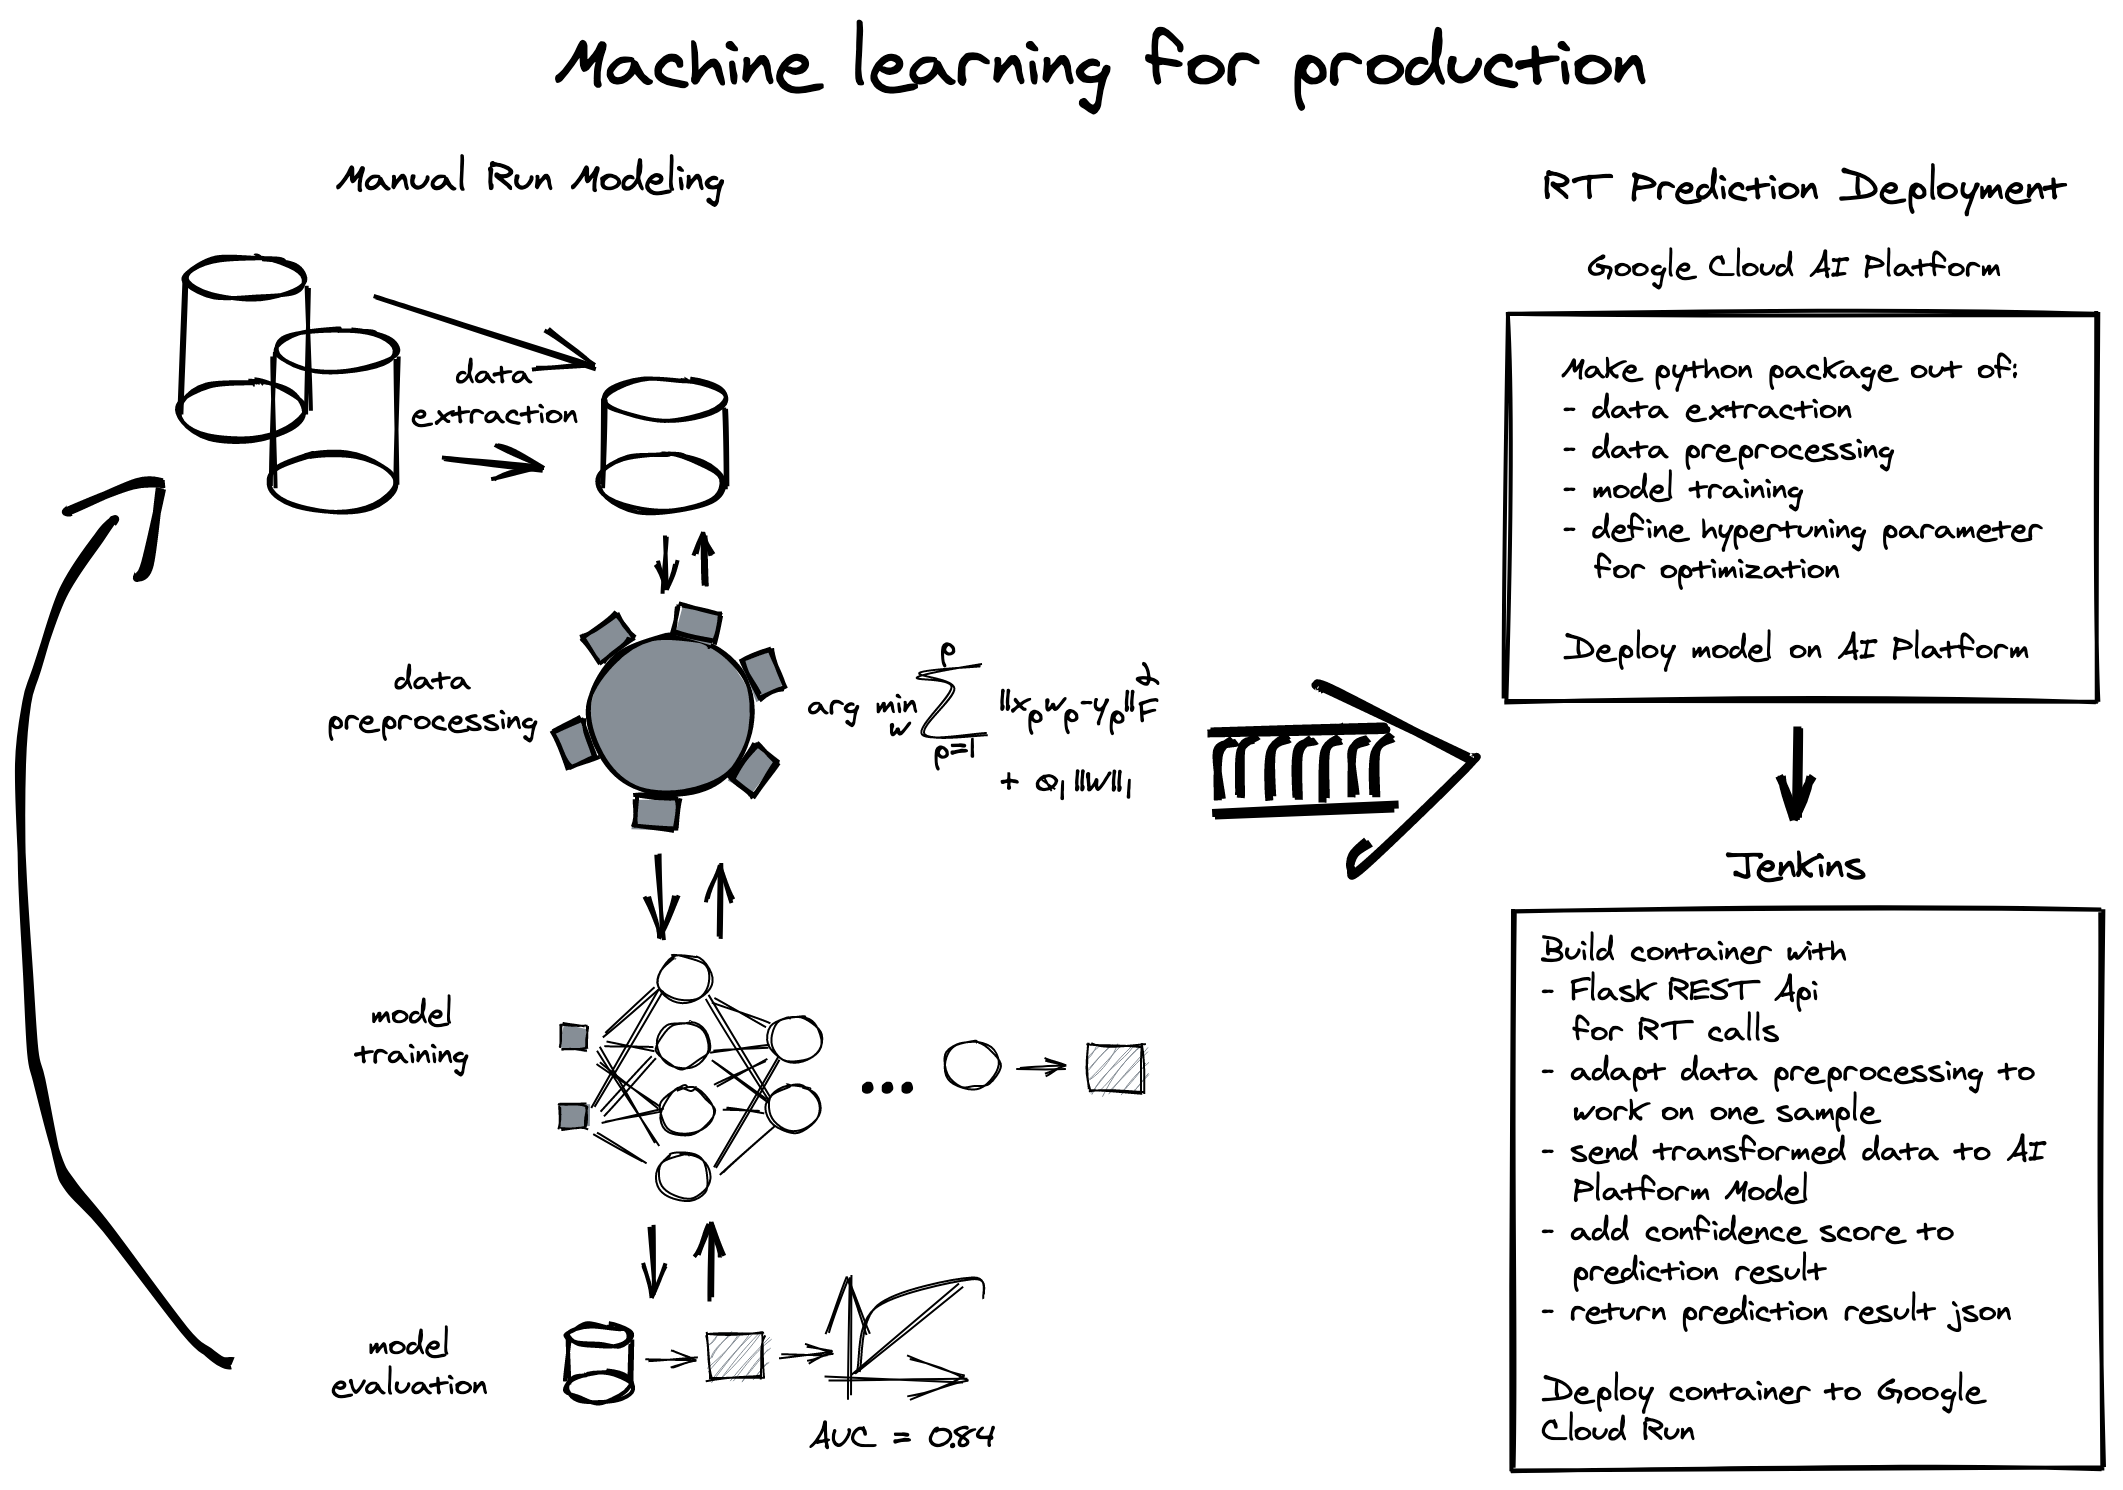
Manual Run Modeling
In the manual part we start by analysing our new task. After that we come up with a hypothesis we want to prove and test.
Development and Prototyping Environment
First we set up a development environment for working on the new task. For this we spin up a Jupyter notebook server. We deploy it on Google Cloud AI Platform. It provides ready to run containers for Jupyter. The notebook approach enables us to develop fast and share results with the team using a browser. With the ability to easily visualize data inline in a notebook, this approach is especially useful in the data extraction and preprocessing process.
Data preparation and visualization
Python provides some nice packages for generating graphics on data for faster insights. This speeds up our prototyping process in the notebook. We are especially fond of using Seaborn.
We load the data identified for this model into a dataframe in the notebook. After that we start looking at each attribute and its values, often in combination with the other attributes. For a first overview we use a pairplot provided by Seaborn.
We use a combination of visualizations, such as e.g. a correlation matrix. Then we decide which attributes to use and how to handle outliers and missing values. Finally we use one hot encoding for categorical attributes and normalize the continuous attributes to create the input into our models.

Model Selection and Evaluation
When the data is ready we choose several models to find a solution for our problem. These models can range from a multilinear regression model over random forests to deep neural networks with Tensorflow.
After splitting the data for training, evaluation and test we decide on a measure each model has to optimize for, e.g. mean squared error or precision. This depends on the kind of problem. Once we identified the best performing model we start by transforming the code for Google Cloud AI Platform.
RT Prediction Deployment
After manual evaluation of preprocessing and modeling, we start the task of automating training and deployment for bringing machine learning models into production. This can be split into three tasks:
- Training the model with hyperparameter optimization on Google Cloud AI platform
- Deploying the model on Google Cloud AI platform
- Deploying an API to access the model for real time predictions
Training on Google Cloud AI Platform
After deciding on a model to go forward into production with, we optimize our code for data extraction and preprocessing. The reason for this is to make it reusable and compliant with Google Cloud AI Platform rules. This means basically we have to create a Python package out of the first three steps.
A project could be set up as shown in the picture below.
Sample structure of AI platform package

This Python package is then deployed to Google Cloud platform and executed there. If you have custom packages there is an option to supply those too. An example call for training on the cloud would then look like the following example.

One advantage of using Google Cloud AI platform is the possibility of using automated hyperparameter tuning for models. This enables us to train a model automatically with different configurations. Then we select the one performing best for the defined measure in hptuning_config.yaml.

In the AI platform dashboard you can then see, which hyperparameter combination of your defined values in params had the best results for the defined hyperparameterMetricTag and goal.

The identified model is then ready to be deployed to the platform, where Google provides an URL to access the model in real time.
Deploying the model on GCP
Deploying to production is done with a Jenkins job. We use Jenkinsfile to define our jobs as part of our code. A model deployment consists of the following steps:
- Copying the model to the correct GCP bucket (differs for our three development systems development, staging and production)
- Deploy model to AI platform using a gcloud command
- Test model with a prepared test dataset

If all of these steps are successful the model is ready for usage in the specified environment via an URL endpoint.
Deploying the Real Time API
Since the model is deployed and accessible using an URL endpoint, we now have to build a transformation API that takes the input data and transforms it into the needed format for the model endpoint and then calls the model.
To make using the model easier for other services, our data entry format is JSON. This makes the data human readable and changes to any steps concerning the model, except changing the number of attributes, can be done without dependencies on our client services.
REST Service
As framework for our REST API we chose Flask, since it is lightweight, flexible, easy to use and also written in Python. Since API and model are written in the same language we can make use of the preprocessing from the training package we needed for training above. The main work here lies in adapting the code to only run one single event, instead of the batch prediction, used to validate the result during training.
For stability and security reasons we added some additional checks:
- JWT token authorization with Flask-JWT
- Input format checks
- all required fields in request
- filling in default values for optional fields
- checking values for validity (ee.g. range or location checks)
We also created an extra package containing all transformation functions, we use in several of our models. This package contains, e.g. min-max-normalization and distance calculation functions.
Speed is important in this component, so we store all data for enriching and transforming the incoming data inside a cache.
After receiving the prediction from the model, we qualify the results for regression models, by adding a confidence value. This helps our clients to better understand the results, especially if they are meant to be shown to end users.
Each of our responses has its own error code and message that is supplied in the result. The result is again in JSON format with the following fields:
- success: true or false, indicating result of request
- message: (error) message for response
- prediction object
Deployment of API
Deployment to our production system is then handled by a Jenkins job with the following steps:
- Unit and integration testing of Flask API
- Building a Docker container for the Flask API
- Pushing Container Image to GCP project repository
- Deploying Container to Google Cloud Run
By using Cloud Run we do not need to worry about hardware configuration and can focus on optimizing the API and the model.
Conclusion
By following this process we make sure that the time spent on the necessary things, beside building a model, for bringing machine learning models into production is kept to a minimum and does not include managing any hardware resources or availability concerns.
Especially the part after the manual data and model selection process is usable as a template to fasten the deployment process. This is thanks to the tools provided by Google and our extracting reusable functions into their own Python package.